Expense tracking is a critical part of personal finance management and running a business. It ensures that you are conscious of where your money is going, and it helps you make informed financial decisions. But tracking expenses can be a tedious process if you don't have the right tools at your disposal. Enter Google Forms, a versatile, free tool that can make the process much more streamlined. Here's how you can use Google Forms for expense tracking.
Step 1: Create a Google Form
- Open Google Forms: Go to Google Forms and sign in with your Google account.
- Start a New Form: Click on the "+ Blank" button to create a new form.
- Title Your Form: Name your form something relevant, like "Expense Tracking."
Step 2: Customize Your Form
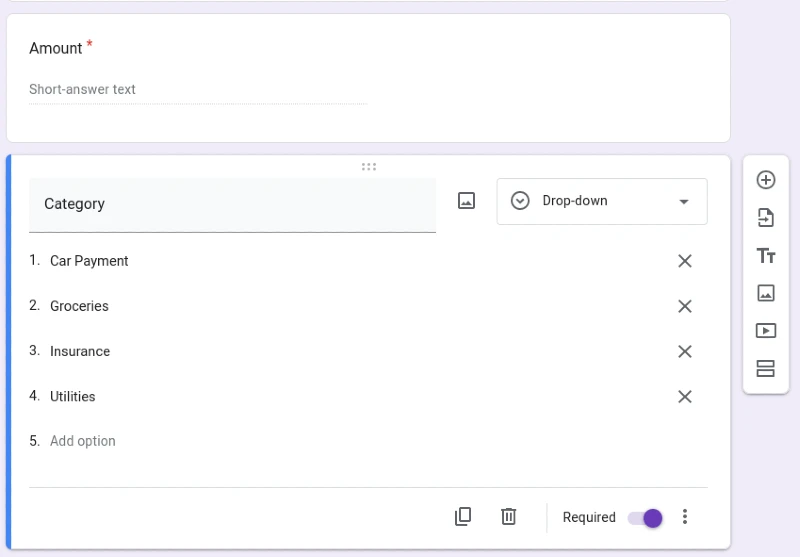
- Add Fields: Customize the form by adding questions for the expense form such as Date, Description, Amount, Category (e.g., groceries, travel, utilities), and Payment Method.
- Choose Field Types: Select appropriate field types, such as date pickers for dates and drop-down lists for categories.
- Make Essential Fields Required: Make sure that crucial information like the date and amount is marked as required.
Step 3: Share Your Form
If you need multiple people to track expenses (e.g., family members or team members), you can share the form:
- Click the "Send" Button: This button is usually found at the top right of the Google Form.
- Choose Sharing Method: You can share via email, a link, or even embed it on a webpage.
Step 4: Collect Responses
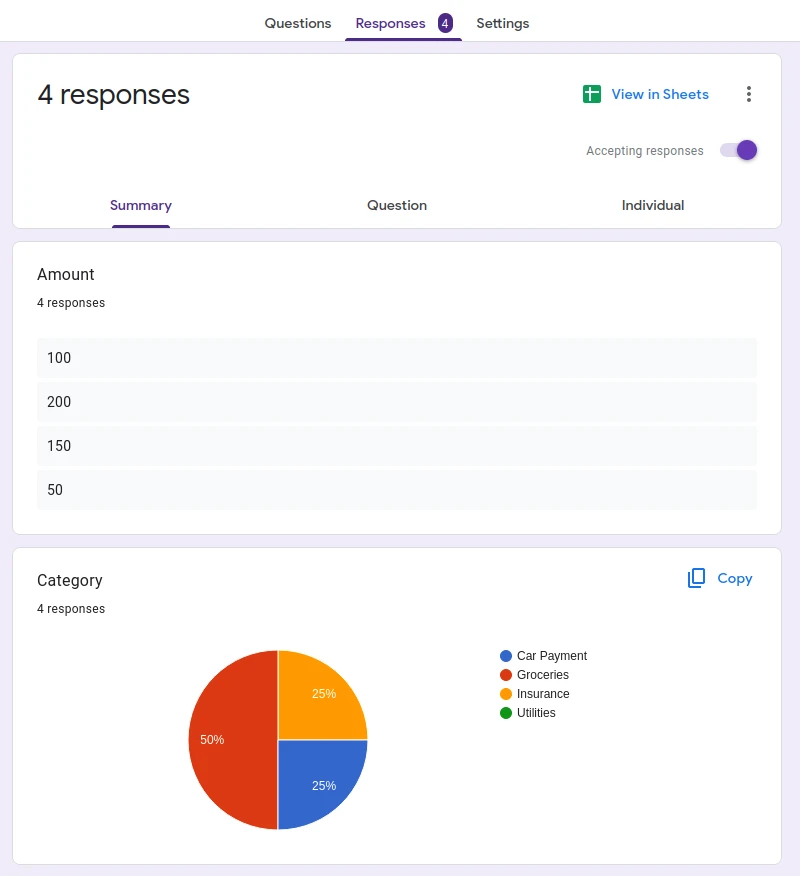
- View Responses: You can view the responses directly in Google Forms or link the form to a Google Sheet where responses will automatically populate.
Step 5: Analyze and Monitor Expenses
- Sort and Filter: Use Google Sheets' sorting and filtering tools to analyze your expenses by date, category, or any other metric.
- Create Charts and Graphs: Visualize your spending trends with Google Sheets’ charting tools.
- Set Up Notifications: If you want to be notified when a new expense is added, you can set up email notifications within Google Forms.
Step 6: Sending Data to Google Sheets and Calculating the Sum
Once your expenses are recorded through Google Forms, you can utilize Google Sheets to organize, analyze, and even calculate the total of those expenses. Here's how to do it:
Sending Data to Google Sheets
- Go to the "Responses" Tab: In your Google Form, click on the "Responses" tab.
- Click on the Green Sheets Icon: This will create a new Google Sheet or link to an existing one, automatically populating it with the responses from your form.
- Monitor Responses: As new responses are submitted via the Google Form, they will automatically appear in the linked Google Sheet.

Calculating the Sum of Expenses
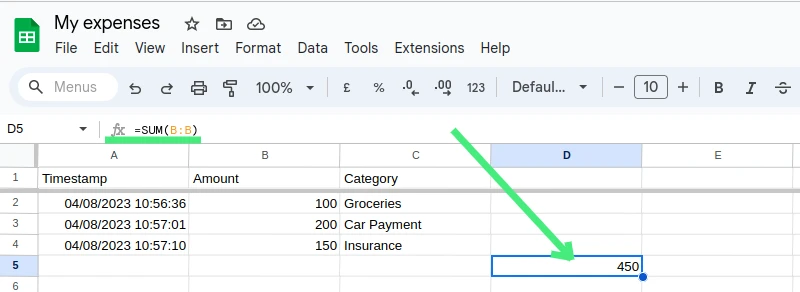
- Identify the Column with the Expense Amounts: Typically, this will be the column corresponding to the "Amount" field in your Google Form.
- Click on an Empty Cell Where You Want the Total to Appear: This is where the sum of your expenses will be displayed.
- Enter the SUM Formula: Type
=SUM( and then select the range of cells containing the expense amounts, or manually type the range (e.g., B2:B100). Close the parentheses and press Enter.
- View the Total: The total of the selected expenses will now be displayed in the cell where you entered the formula.
Advanced Analysis (Optional)
If you want to take your analysis further, you can:
- Calculate Sums by Category: Use the
SUMIF function to calculate totals for specific categories.
- Create Monthly Summaries: Utilize pivot tables to summarize expenses by month.
- Build Interactive Dashboards: Use data visualization tools within Google Sheets to create interactive dashboards that provide insights into your spending patterns.
Sending data from Google Forms to Google Sheets not only simplifies the collection of expenses but also opens doors to powerful analysis capabilities. By calculating the sum of expenses directly within Google Sheets, you gain instant insights into your total spending, allowing for more effective budget management and financial planning.
With these advanced tools at your fingertips, Google Forms and Sheets together become a robust, cost-effective solution for personal or business expense tracking. Try integrating these steps into your expense tracking process, and enjoy greater control and visibility over your financial landscape.
Frequently asked questions
Google Forms uses encryption and offers various privacy settings. However, it's essential to be mindful of the information you store and who you share the form with, as sensitive financial data may be involved.
Yes, Google Forms allows you to fully customize categories, so you can tailor them to your specific needs, whether for personal or business expense tracking.
You can share the form by clicking the "Send" button and choosing the desired sharing method, like email or a direct link. You can also adjust the permissions to control who can view or edit the form.
Absolutely! Google Forms is accessible through browsers on smartphones and tablets, and the Google Sheets app allows you to view and analyze the data on the go.
You can mark critical fields as "Required" within Google Forms, ensuring that respondents cannot submit the form without filling out those particular sections.
Yes, you can set up email notifications within Google Forms, so you receive an email whenever a new response is submitted.
Yes, you can either create a new Google Sheet or link the form to an existing one. Responses will automatically populate in the sheet, allowing for further analysis and calculations.
You can use the SUM function in Google Sheets to calculate the total expenses. You may also use other functions like SUMIF for category-specific totals or pivot tables for monthly summaries.
Google Forms for expense tracking can be adapted for both personal and business use. The customization and integration with Google Sheets provide flexibility to meet various needs.
Google Forms and Sheets are free to use with a standard Google account. Some advanced features may require a subscription to Google Workspace, but the basics for expense tracking are available at no cost.
Conclusion
Google Forms offers a simple yet effective solution for tracking expenses, whether you're monitoring personal spending or managing a business budget. Its seamless integration with Google Sheets enables in-depth analysis and reporting.
With a bit of customization and a clear understanding of how Google Forms works, you can set up an expense tracking system tailored to your needs. It’s a free, user-friendly alternative to other expense tracking tools, and it’s accessible from any device with internet access. Try it out today, and take control of your finances!