
3 Ways to Publish a Google Form
Published: 3 years ago
Whenever you're organizing a workshop, setting up a class, or preparing for any group activity, the starting point is often gathering attendee details. Google Forms stands out as a straightforward, streamlined solution to this task. With its intuitive design and easy-to-use features, it can transform the often tedious process of registration into a breeze. In this blog post, we'll guide you meticulously through the process of crafting an efficient Google Form for your registration needs. Ready to simplify your next event's sign-up process? Let's jump in!

Registration forms, particularly those offered through platforms like Google Forms, have revolutionized the way event planners and organizations collect participant data. These simple yet efficient tools offer several advantages:
Efficiency and Speed: Gone are the days of manual registrations with paper and pen. With digital forms, participants can sign up in minutes, and organizers receive data instantly.
Accuracy: Digital registration reduces the risk of human errors, ensuring that the information collected is accurate and reliable.
Flexibility: Easily update or modify your registration forms without having to reprint or redistribute them.
Cost-Effective: No printing costs, no distribution fees, just a simple link sent via email or shared on social media.
Real-Time Analytics: Get immediate insights on how many people have registered, their preferences, or any other data points you've collected.
Environmentally Friendly: Reduce the carbon footprint by going paperless.
Integration Capabilities: Many digital forms, including Google Forms, can be integrated with other software tools for even smoother event management.
In a nutshell, the strategic use of registration forms not only simplifies the process but also enhances the experience for both organizers and attendees.
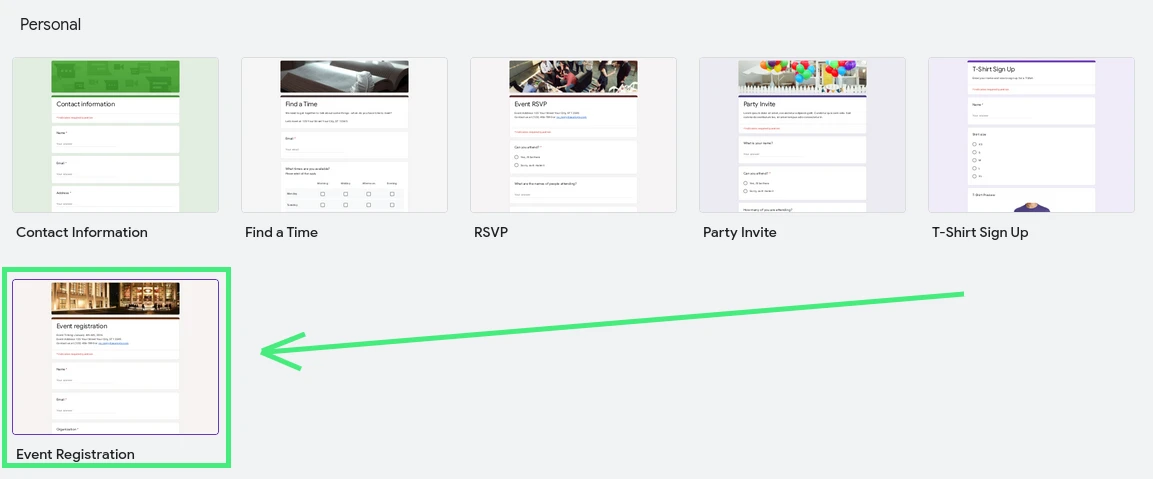
Start by accessing Google Forms through your browser. If you're not already signed in, you'll be prompted to enter your Google credentials. Once you're in the main dashboard, you'll see an option for 'Template Gallery' typically located at the top. Click on it to view various pre-designed form templates.

Within the Template Gallery, you'll find a variety of templates designed for different purposes. Look for the one labeled 'Event Registration'. Click on this template to select it and open a new form based on this design.
At the top of your new form, you'll see a default title. Click on it to edit. Here, you can input the name of your event or any title you find suitable. Beneath the title, there's a space for a description. Use this space to provide attendees with details about the event such as date, time, location, and any other pertinent information.

By default, the Event Registration template will have some pre-set questions. To edit any question, simply click on it. You can change the question type (multiple choice, short answer, etc.), the question text, and the available answers. Add or remove questions as necessary to capture all the information you need from your attendees.
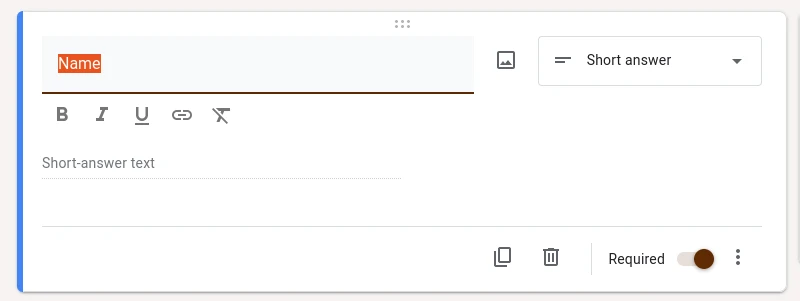
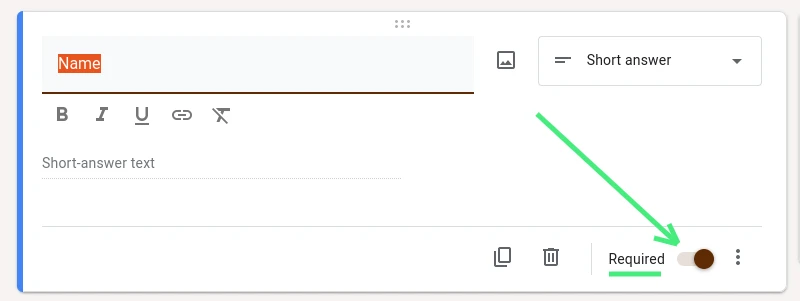
To ensure that participants don't miss any crucial questions, you can set them as 'required'. Click on a question to select it, and you'll find a 'Required' toggle switch, usually at the bottom right of the question box. Turn this on to make answering the question mandatory before the form can be submitted.
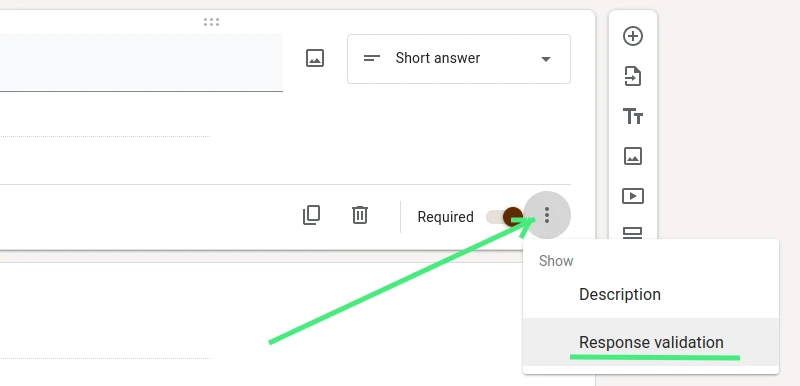
For some questions, you might want specific types of answers (e.g., email format, numerical data, etc.). To set this, click on the question and find the 'Response validation' option. This allows you to set criteria for acceptable answers, and you can also customize an error message for incorrect inputs.
Google Forms allows you to customize the look and feel of your form. Click on the palette icon (at the top right) to adjust theme colors, fonts, and to add a custom header image. This can help match the form's aesthetics to your event's branding or theme.

Once you're satisfied with your form, it's time to share it with potential attendees. At the top right, you'll find the 'Send' button. Clicking on it opens options to share the form via email, link, or even embed it on a website. Choose the method that best suits your needs, and your form will be ready to collect registrations!

In the world of event registrations, efficiency, urgency, and engagement are paramount. One overlooked, yet invaluable tool to boost these factors is the countdown timer. Here’s why incorporating a timer can be a game-changer:
Urgency and Commitment: A visible ticking clock can instill a sense of urgency in participants, prompting quicker decision-making and action. This reduces the likelihood of potential attendees abandoning the registration midway.
Enhanced User Experience: For forms that might have time limits, such as early-bird registrations or limited-time discounts, a timer ensures transparency, letting registrants know how long they have left to complete their submission.
Efficient Data Collection: For event planners, a timer can help streamline the influx of responses. By setting clear timelines, organizers can better predict and manage the volume of incoming registrations, aiding logistical planning.
However, as versatile as Google Forms is for creating registration platforms, it doesn’t offer a built-in countdown timer feature. This can be a stumbling block for those aiming to provide a seamless registration experience with the added urgency that a timer brings.
Thankfully, there's a solution: the add-on known as "Timer for Google Forms." This tool seamlessly integrates with your Google Form, allowing you to easily set up a countdown timer, enhancing the efficiency and interactivity of your registration process. By leveraging this add-on, event planners and organizers can overcome the inherent limitation of Google Forms and provide a more engaging, timely, and efficient registration experience for attendees.
Events, whether they are workshops, seminars, or conferences, often come with costs. While many organizers aim to offer value-laden experiences, recouping investments or ensuring a committed attendance often requires a fee. Charging for attendance can reduce no-shows, ensure genuine interest from participants, and help cater better to an audience by offering enhanced amenities or resources.
However, collecting payments can sometimes become a logistical challenge. This is especially true if you're reliant on traditional methods or external payment platforms that require attendees to navigate away from the registration process.
Google Forms, by default, does not offer a direct way to collect payments. But this is where the power of add-ons comes into play. One such solution is "Payable Forms." This add-on integrates seamlessly with Google Forms, transforming a standard registration form into a secure payment gateway.
With Payable Forms, attendees can efficiently complete their registration and payment in one go, reducing friction and drop-off rates. For organizers, it centralizes data collection and payment processing, making management and tracking a breeze. Whether you're hosting a premium workshop or a community event with a small fee, leveraging Payable Forms can simplify the financial aspect of your event, ensuring you focus on what truly matters: delivering a memorable experience for your attendees.
Importance of Timers: A countdown timer, not native to Google Forms, can significantly boost registration completion rates by instilling a sense of urgency.
The Solution to Timers: The "Timer for Google Forms" add-on allows organizers to easily integrate a countdown feature, improving user experience and registration efficiency.
Benefits of Paid Registrations: Charging a fee for event attendance can ensure genuine interest, reduce no-shows, and help in providing better amenities to the attendees.
Collecting Payments Seamlessly: While Google Forms lacks a direct payment collection feature, the "Payable Forms" add-on bridges this gap, allowing for a smooth registration-payment process.
Centralizing Registration and Payment: Integrated solutions like Payable Forms not only offer a seamless user experience but also help organizers centralize data collection and financial management, ensuring a successful and well-managed event.
Remember, while Google Forms is a powerful tool on its own, its true potential is unlocked when combined with specialized add-ons tailored for specific needs.
Related Articles
Just discovered Nerdy Form? Try our free form builder now!
Sign up for FREE