
How to Add a File in Google Form
Published: 3 years ago
Google Forms is an incredibly versatile tool that allows you to collect information from users via custom surveys and forms. One of the features that makes Google Forms so powerful is its ability to validate responses. This functionality can help to ensure that the information you collect is accurate and in the format you need. In this blog post, we'll explore how to enable validation for your Google Forms and the different types of validation you can use. We will also delve into the benefits of validating your forms.
Another excellent feature of Google Forms is the ability to make a question required. This ensures that a respondent cannot submit the form without answering a specific question. It is particularly useful when you have essential data points that you absolutely need from your respondents.
To make a question required, all you need to do is click on the question you want to modify and toggle on the "Required" slider at the bottom right of the question box. When this feature is turned on, respondents will see a small asterisk (*) next to the question, signifying that it's a required field. If they attempt to submit the form without answering, an error message will appear, prompting them to complete the question before proceeding.
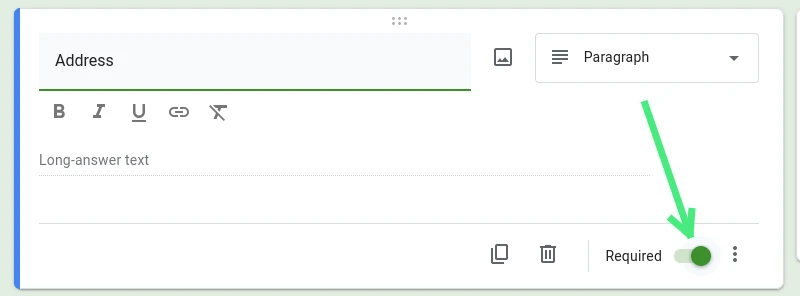
By making a question required, you can ensure that you collect all the necessary information from your respondents, improving the completeness of your data. However, it's important to use this feature wisely. Too many required questions might discourage respondents and affect your response rates. Balance is key in achieving a high-quality, user-friendly form.
Enabling validation in Google Forms is a simple and straightforward process. Here are the steps:
Open your Google Form: Head to Google Forms and either create a new form or edit an existing one.
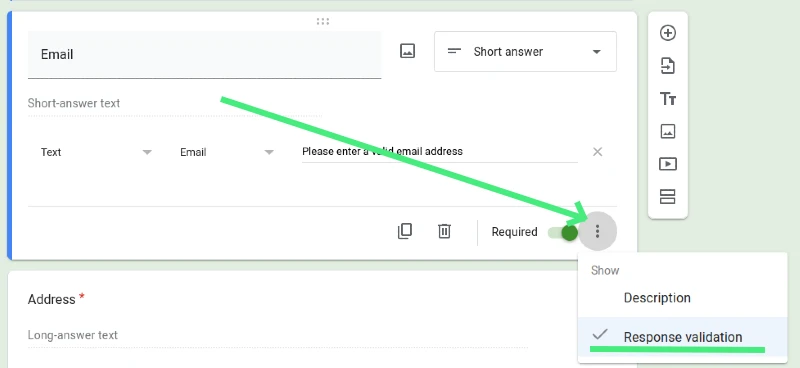
Select the question you want to validate: Click on the question you want to validate. Remember, validation can be applied to different types of questions including short answer, paragraph, and multiple-choice questions.
Turn on validation: At the bottom of the question, you will find three dots for "More". Click on that and a dropdown menu will appear. Select "Response validation".
Set the criteria: Once you've enabled validation, you'll need to define the criteria that responses must meet. These options vary based on the question type and are discussed in more detail in the next section.
Google Forms offers various types of validation depending on the type of question you're asking.
For text questions (both short answer and paragraph), there are several validation options:
Number: You can ensure that the response is a number, and even specify criteria such as greater than, less than, equal to, not equal to, between, or not between certain numbers.
Text: You can check for certain words, or ensure the response contains, does not contain, or exactly matches a specific text.
Length: You can specify a minimum, maximum, or exact character count.
While multiple choice, checkboxes, and dropdown questions don't have built-in validation (since respondents are choosing from a set list of answers), you can enable the "Go to section based on answer" feature to guide respondents to different sections depending on their answers.
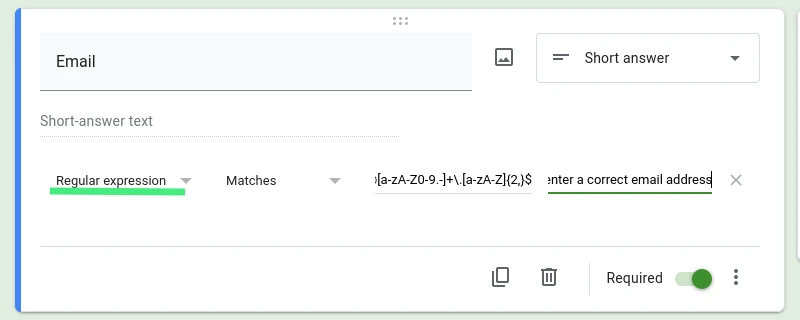
Regular expressions (often shortened to "regex") might seem like a complex, technical concept. In reality, however, they are just patterns used to match and find certain combinations of characters within a string of text. Regular expressions are very powerful and can be used in Google Forms to enforce more specific response criteria.
Imagine you're trying to find a needle in a haystack, but instead of a needle, you're looking for a specific pattern of text in a vast amount of data. This is where regular expressions come in handy. They are essentially a sequence of characters that forms a search pattern. This pattern can then be used to find or replace words or character combinations in a larger body of text.
For example, you might use a regular expression to check if an email address is in the correct format, i.e., 'something@domain.com'.
Google Forms allows you to use regular expressions to validate text input. This can be incredibly useful if you need responses to meet specific criteria that aren't covered by the standard validation options. Here's how you can enable this feature:
While regular expressions can get very complex, there are some common patterns that can cover a lot of basic validation needs:
^[a-zA-Z0-9._%+-]+@[a-zA-Z0-9.-]+\.[a-zA-Z]{2,}$^\(?([0-9]{3})\)?[-. ]?([0-9]{3})[-. ]?([0-9]{4})$^https?:\/\/[^\s$.?#].[^\s]*$Remember, while these patterns are very useful, regular expressions can be quite complex and the specifics can vary based on your requirements.
Regular expressions offer a powerful tool for validating responses in Google Forms, allowing you to fine-tune your criteria to ensure you gather the data you need. Even for those who are not particularly tech-savvy, understanding the basics of regex validation can greatly improve the effectiveness and accuracy of your forms.
Google Forms gives you the ability to not only validate responses but also to create custom error messages. These messages appear when a user attempts to submit a form without meeting the specified validation criteria. Custom error messages are a useful tool to guide users to provide the desired information correctly, leading to a better user experience and more accurate data collection.

Here's how to set up a custom error message:
Set up your validation criteria: Follow the steps outlined above to reach the 'Response Validation' section for your chosen question.
Enter your custom error text: Once you've set your validation criteria, you'll notice a field labeled "Custom error text". Here, you can input your own message that users will see if their response fails validation. The error message should be helpful and specific, guiding the user to correct their mistake.
For instance, if you have a question where you're asking for an email address and you've set a regular expression validation to check for a proper email format, your custom error message could be "Please enter a valid email address in the format: yourname@domain.com".
Be clear and specific: Vague error messages can confuse users. Instead, clearly explain what went wrong and how it can be fixed.
Maintain a polite tone: Avoid blaming the user for the error. Maintain a friendly tone that suggests a collaborative effort to fix the issue.
Keep it concise: While it's important to be specific, you also don't want to overwhelm the user with too much information. Try to convey your message as briefly as possible.
Use plain language: Avoid using technical jargon. Keep in mind that not all users will understand such terminology.
With a better understanding of Google Forms' validation feature, including setting up custom error messages, you can create more user-friendly forms that increase response accuracy. Custom error messages provide users with guidance when they encounter an issue, resulting in a smoother, more intuitive form-filling experience.
Utilizing validation in your Google Forms can provide numerous benefits, including:
Increased data accuracy: By specifying the format and type of responses you accept, you can reduce the chance of errors and ensure the data you collect is accurate.
Improved user experience: Validation can help users understand what kind of response is expected, reducing confusion and frustration.
Efficiency: Validation can save you time by reducing the need for manual data checking and cleaning. It can also prevent irrelevant or incorrect responses from being submitted.
Control over the flow of the form: With multiple choice or dropdown questions, directing respondents to different sections based on their answers can help you gather more relevant information and maintain a logical flow in your form.
In conclusion, validation is an essential feature in Google Forms that can help you collect more accurate, relevant, and reliable data. It enhances the user experience, saves time, and offers greater control over the data collection process. Whether you're conducting an academic research survey or collecting customer feedback, validation is a powerful tool to optimize your Google Forms.
Related Articles
Just discovered Nerdy Form? Try our free form builder now!
Sign up for FREE