
How to Create Google Form QR Code
Published: 3 years ago
Implementing conditional logic in a form from scratch can be a difficult and time-consuming task, as it typically requires coding experience. Manually coding conditional branching involves writing and debugging JavaScript or another programming language, which can be daunting for those without a technical background. This process can also be labor-intensive, as it involves extensive testing to ensure that the form functions correctly for all possible user inputs.
By using form builder applications like Google Forms, you can bypass the complexity of manual coding and quickly create forms with conditional branching. These user-friendly platforms provide an intuitive interface, enabling even those without coding experience to design dynamic, responsive forms with ease.
Google Forms is a powerful, user-friendly tool that allows you to create and share custom online forms, surveys, and quizzes. One of its most valuable features is conditional branching, which enables you to create dynamic forms that adapt to users' responses in real-time. This not only streamlines the form experience for your respondents but also leads to better data collection and analysis. In this blog post, we will discuss the benefits of using conditional logic in Google Forms and provide a step-by-step guide on how to implement this feature in your forms.
By using conditional branching, you can tailor the questions presented to users based on their previous responses. This makes the form more relevant and engaging, as respondents only see questions that apply to them. It also reduces complexity and confusion, as users do not have to navigate through unnecessary or irrelevant questions.
Conditional logic allows you to ask context-specific questions, providing you with more accurate and detailed insights. For example, if you are conducting a survey on dietary preferences, you can ask follow-up questions about specific dietary restrictions only to those who indicate they have them. This targeted approach reduces the likelihood of irrelevant or incorrect responses and makes data analysis more efficient.
With conditional branching, you can create dynamic form sections that adapt to user input. This allows you to keep your forms organized and easy to navigate, making it simpler for you to analyze the data and generate reports.
Once you are in Google Forms, you can create a new form by clicking the "+" button, or edit an existing form by selecting it from your list of forms.
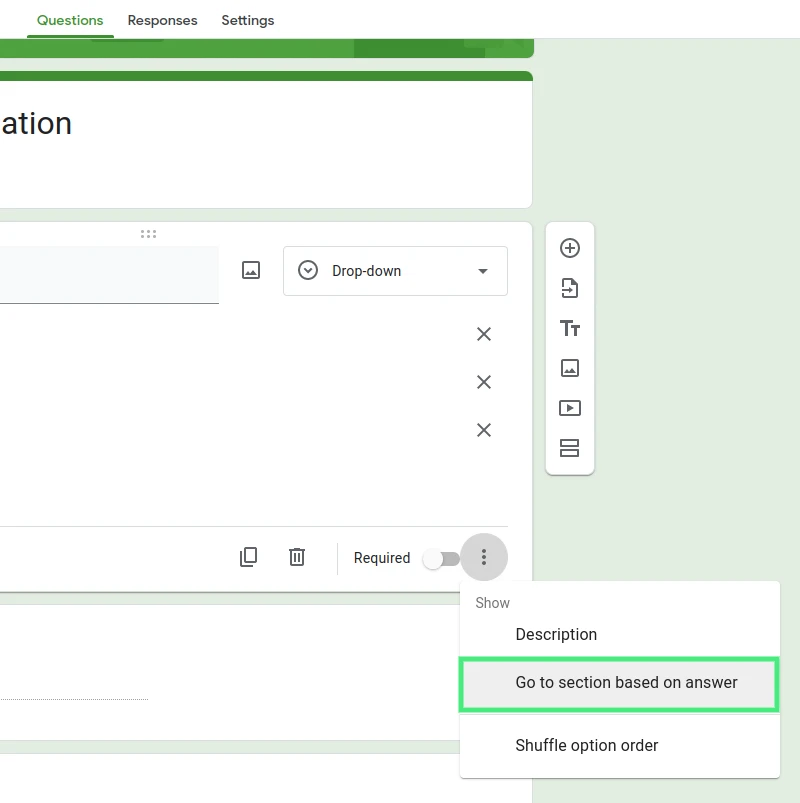
1. Select the question to which you want to apply branching logic. Keep in mind that conditional branching is best suited for multiple-choice, checkbox, or dropdown questions.
2. Click on the three-dot menu in the bottom right corner of the question and choose "Go to section based on answer." This will activate the conditional branching feature for that specific question.
3. Now, assign a specific section to each answer choice by clicking the dropdown menu that appears next to the answer options. For example, if you have a multiple-choice question with options A, B, and C, you can direct respondents who choose option A to section 1, option B to section 2, and option C to section 3.

After setting up your form with conditional branching, click the "Preview" button (an eye icon) in the top right corner of the form editor to test your form in a new browser window. This allows you to experience the form as a respondent would.
Carefully go through the form, testing each possible path to ensure that the conditional branching is functioning correctly. Make any necessary adjustments to the form, and repeat the testing process until you are satisfied with the results.
Keep the form simple and user-friendly: While conditional branching can make your forms more dynamic and engaging, be cautious not to overcomplicate them. Focus on making the form easy to understand and navigate, as this will encourage respondents to complete it.
Avoid excessive branching: While it might be tempting to create a complex web of branching options, this can lead to confusion and frustration for respondents. Use conditional branching judiciously and ensure that the logic is clear and straightforward.
Clearly label sections and questions: To maintain organization and make it easier to analyze the collected data, be sure to use descriptive titles for your sections and questions. This will also help you when setting up the branching logic, as you can quickly identify which sections to link to specific answers.
Test the form thoroughly before sharing with respondents: It's essential to ensure that your conditional branching is functioning correctly before sharing the form with your target audience. Take the time to test every possible path and make any necessary adjustments to avoid errors and confusion.
Google Forms is a powerful tool, widely known for its intuitive 'branching' feature, enabling the creation of dynamic forms. This capability makes the forms adapt to user responses, delivering a personalized path for each respondent. However, Google Forms fall short in one particular area - the ability to support calculated fields natively.
Despite this limitation, fear not, for there's a handy workaround. By using specific add-ons, you can add the functionality of calculated fields into your Google Forms. This integration of calculated fields thus allows Google Forms to truly become a comprehensive solution for your data collection needs, offering a dynamic, interactive, and highly efficient user experience.
Conditional branching in Google Forms is a powerful feature that allows you to create more engaging, relevant, and organized forms. By implementing conditional logic in your form design, you can streamline the user experience, enhance data collection and accuracy, and improve the overall organization of your forms. By following the step-by-step guide and best practices outlined in this blog post, you can begin to unlock the full potential of conditional branching in Google Forms and elevate your data collection efforts.
Google Forms is one of several form builder applications that offer conditional logic for free, making it an excellent choice for individuals and organizations on a budget. Another free option that provides conditional branching is Nerdy Form. Both of these platforms enable users to create dynamic, responsive forms that adapt to respondents' inputs, ensuring a more personalized and relevant experience. By choosing one of these free tools, you can take advantage of the powerful benefits of conditional branching without incurring additional costs.
Related Articles
Just discovered Nerdy Form? Try our free form builder now!
Sign up for FREE