
How to Create Google Forms on Mobile
Published: 3 years ago
Every website needs a way for visitors to get in touch. Whether it's for questions, feedback, or business chats, a contact form is a handy tool. While there are many options out there to add one, Google Forms stands out. It's free, easy to use, and does the job well. In this guide, we'll show you how to use Google Forms to make a contact form for your website, so your visitors have a clear and simple way to reach out.
Cost-Effective: One of the biggest draws of Google Forms is that it's completely free. This means you can have a fully functional contact form on your site without any added costs.
User-Friendly Interface: Even if you're new to creating online forms, Google Forms offers an intuitive interface that makes the process straightforward. You can easily customize and design your form without needing any technical skills.
Customizable Design: With a variety of themes and color options, you can make your contact form blend seamlessly with the aesthetic of your website or stand out to grab attention.
Reliable Data Storage: All responses from your contact form are stored securely in Google Sheets. This not only ensures the safety of the data but also allows for easy organization and analysis.
Mobile-Friendly: In an era where mobile browsing dominates, it's essential that your contact form looks and works well on smartphones and tablets. Google Forms are designed to be responsive, so they adjust to any screen size.
Integration with Other Google Services: If you're already using other Google services, like Google Drive or Google Calendar, integrating them with your contact form is a breeze. This can streamline tasks like scheduling appointments or storing attachments.
Notifications: You can set up notifications so you're immediately informed when someone fills out your contact form. This ensures timely responses to queries or feedback.
Accessing Google Forms: First things first: log in to your Google account. If you don’t have one, it’s easy to create. Once logged in, head over to the Google Forms website.
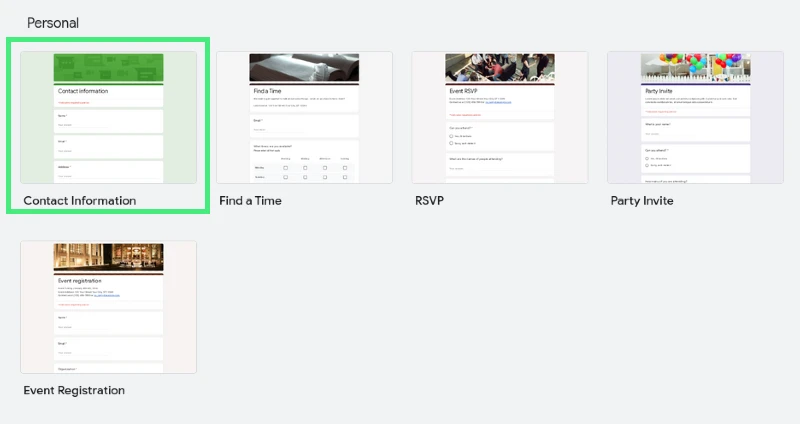
Starting Fresh or Using a Template: Google Forms provides two main options to start. You can either:
Designing the Form: Here's a step-by-step guide on shaping your form:


Form Preview: Before you finalize your form, preview it by clicking on the eye icon. This shows you how the form will appear to users. It’s a good idea to run through it once to ensure everything is in order.

Embedding your Google Form into your website allows visitors to fill it out without ever leaving the page. The process is quite straightforward and doesn't require extensive technical knowledge.
Generating the Embed Code:

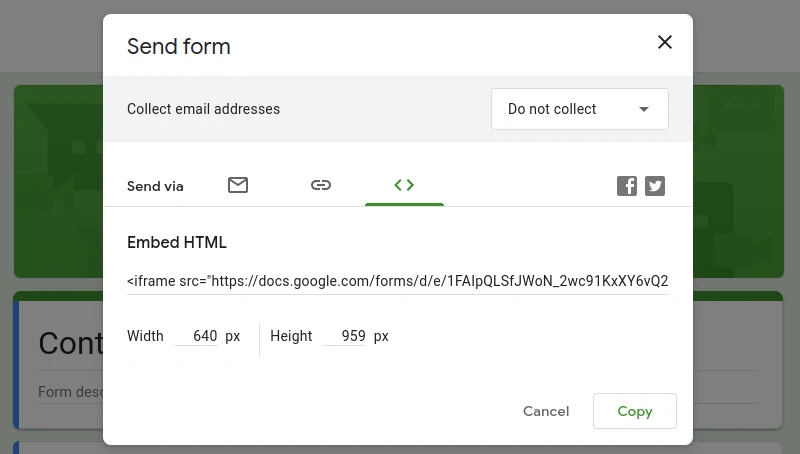
Placing the Form on Your Website:
Finalizing the Embed: After pasting the code, save or update the changes on your website. Check the live site to ensure the form displays correctly and is functional.
Using Google Forms for your contact form is a good choice, but to maximize its potential and ensure the best experience for your website visitors, consider these tips:
Keep the Form Simple and Short: A lengthy or complicated form can deter visitors from filling it out. Aim for clarity and only ask for the essential information.
Responsive Design Matters: Ensure that your form looks and works well on both desktop and mobile devices. Google Forms are inherently responsive, but always preview and test on different screens.
Regularly Test the Form: Occasionally submit a test response to ensure it's working correctly, and you're receiving notifications.
Privacy is Paramount: Always inform users about how their data will be used. If you're collecting sensitive information, consider enabling the option in Google Forms to anonymize responses.
Prompt Feedback: Consider adding a 'thank you' message or redirecting users to a thank you page after they submit the form. This gives them confirmation that their response was received.
Avoid CAPTCHA if Possible: While it's essential to prevent spam, CAPTCHA can sometimes be a deterrent for users. Google Forms has built-in spam detection, so in most cases, CAPTCHA might be unnecessary.
Backup Your Data: Though Google Forms securely stores responses, it's a good habit to periodically back up data to avoid any unforeseen losses.
Stay Updated: Google occasionally rolls out new features or updates to its services. Stay informed to utilize any new tools or adjustments that can improve your contact form.
While Google Forms is undeniably a convenient tool for whipping up basic contact forms, it does present some limitations, especially when advanced features come into play. Though there are third-party add-ons to bridge this gap, not everyone wants to juggle between multiple tools. For those seeking a comprehensive solution, there's Nerdy Form.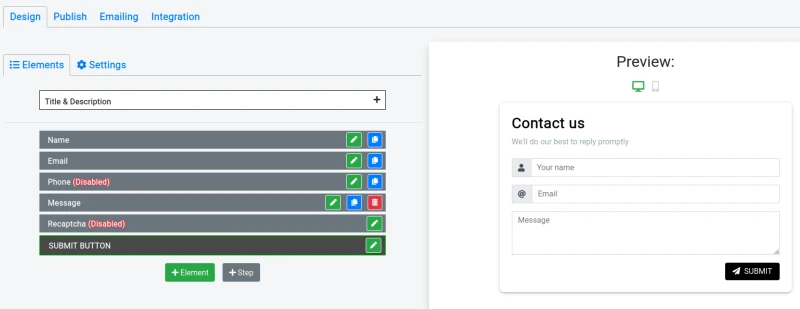
Nerdy Form isn't just another form builder. Its drag-and-drop functionality offers an intuitive experience, allowing users to craft unique and sophisticated contact forms with ease. The platform's built-in features eliminate the need for external plugins or add-ons, streamlining the form-building process. For those who wish to create detailed and custom-tailored contact forms without the fuss, Nerdy Form emerges as a top-tier choice, rivaling even established tools like Google Forms.
Google Forms stands as a reliable choice for those seeking a straightforward, no-cost solution. Its user-friendly interface and easy embedding process make it a favorite for many. Yet, as with all tools, it may not cater to every advanced need. That's where alternatives like Nerdy Form shine, offering a broader range of features and customization right out of the box.
Ultimately, the best tool hinges on your specific needs, preferences, and the level of sophistication you desire in your contact forms. Whether you're leaning towards the simplicity of Google Forms or the comprehensive offerings of Nerdy Form, the key lies in ensuring a seamless experience for your website visitors, facilitating open channels of communication and feedback.
Related Articles
Just discovered Nerdy Form? Try our free form builder now!
Sign up for FREE