
3 Ways to Publish a Google Form
Published: 3 years ago
Google Forms is an incredibly versatile tool that can be utilized for everything from simple surveys to complex quizzes. One of the lesser-known but incredibly useful features is the ability to share a Google Form with pre-filled answers. This feature can come in handy in several scenarios, such as when you want to guide responses, reduce user error, or save time for respondents. In this post, we'll walk you through how to get a pre-filled link for your Google Form.
To begin with, create your Google Form as you normally would. Add all the necessary questions, options, and sections. If you haven't created a Google Form before, Google's support page provides a comprehensive guide on how to do so.
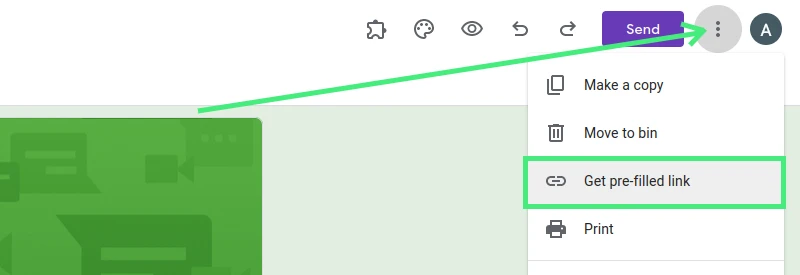
After you have filled out the form with the answers you want to pre-fill, you're ready to generate the pre-filled link. Click on the vertical three dots button on the top right corner of the form page. This will open a drop-down menu with various options. Look for the option that says "Get pre-filled link" and click on it. You will be redirected to the form in order to fill it in.
Once your form is ready, you'll need to fill it out with the answers you want to pre-populate. Fill out the answers as you want them to appear in the pre-filled version. When the form is filled in, click on the "Get link" button at the bottom of the form. After that, click "Copy link" at the left bottom side of the screen.

Once you have your pre-filled link, you can share it just as you would any other link. You can send it via email or share it through social media. When the recipient clicks the link, they'll see your form with the answers already filled in. They can then review the answers, make changes if necessary, and submit the form.
Remember, pre-filled responses are not set in stone. The respondents have full control over their answers and can change the pre-filled responses before they submit the form.
After you've followed the steps above to create your pre-filled Google Form and generate the pre-filled link, you also have the option to embed this form directly on your website. This option is incredibly useful if you're trying to integrate the form into a web page and provides a seamless experience for your users. Here's how to do it:
Get the Embed HTML Code: On your Google Forms page, click on the "Send" button in the top-right corner of the page, which will open a menu. Choose the 'Embed HTML' tab. This will bring up a pop-up window with an <iframe> tag, which is a snippet of HTML code.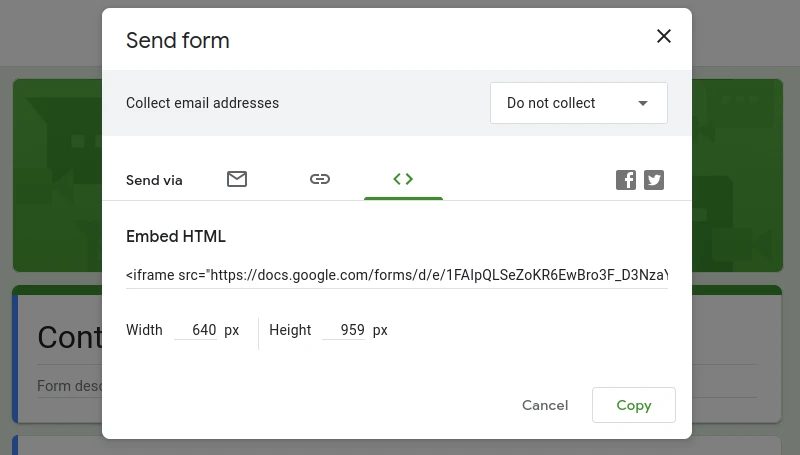
Replace the 'src' attribute: In the <iframe> tag, you'll see an attribute called 'src'. This attribute contains the URL of the form. Replace this URL with the pre-filled link that you generated earlier.
The modified iframe tag should look something like this:
<iframe src="YOUR_PREFILLED_LINK_HERE" width="640" height="480"></iframe>
That's it! Your pre-filled Google Form should now be embedded in your web page. Visitors to your website can fill out the form directly on the page, and their responses will be recorded in the same way as if they filled out the form via the original link.
Remember, while the form is pre-filled with the responses you've provided, users can still change these responses before submitting the form. This feature allows you to guide users towards specific responses while still giving them control over their final answers.
The option to create a Google Form with pre-filled answers and share it either through a direct link or by embedding it on your website offers tremendous versatility. This functionality not only saves time for the respondents but also helps to guide them towards the desired responses, reducing the chances of error.
Whether you are using it for surveys, event registration, or educational quizzes, this hidden gem tucked under the three-dot button in Google Forms can truly enhance your data collection process. However, it's important to always remember to use this feature ethically, respecting data privacy and integrity while adhering to Google's terms of service and regional regulations.
By effectively leveraging this feature, you can streamline your data collection, improve user experience, and make your Google Forms even more powerful and efficient. So, the next time you're about to create a form, remember these tips and techniques to unlock new possibilities!
Related Articles
Just discovered Nerdy Form? Try our free form builder now!
Sign up for FREE